Are you throwing a frozen birthday party? Are you looking for a great frozen birthday cake to serve to your guests? Your birthday girl, as well as your guests, will love this frozen birthday cake!
This site contains affiliate links. If you make a purchase using one of these links, I may earn a commission. Please visit my disclaimer page for more information about cookies collected and our privacy policy.
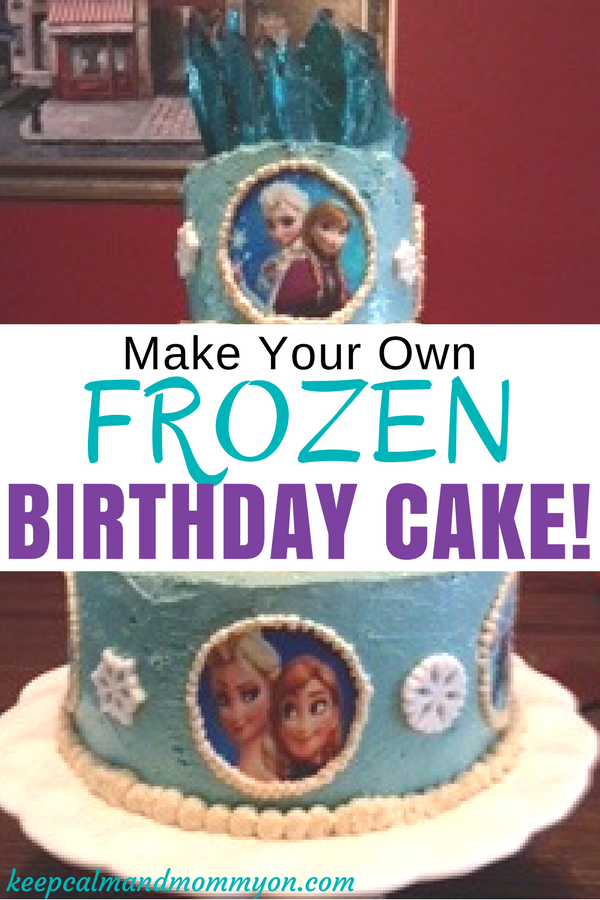
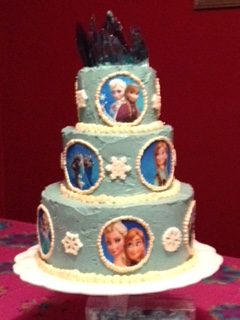
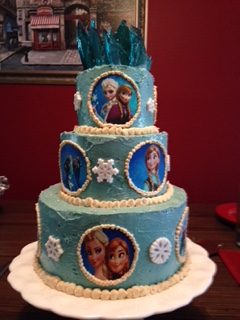
How To Make a Frozen Birthday Cake!
When my daughter decided that she wanted to have a frozen birthday party I started brainstorming the cake!
The cake is always what I think of first for birthday parties. It kind of sets the tone for the rest of the party.
I knew that I wanted something tall. To be honest, it was more cake than we needed for the amount of people that we had at the party! But parties are about having fun right;)
So big cake it was!
This frozen birthday cake is 3 tiers tall, with two cake layers in each tier.
You can use whatever cake you would like. I used a combo of both chocolate and vanilla cakes so that everyone could have something that they liked!
I usually do fondant covered cakes for the wow factor, but, this time I decided to do something simpler that would taste great and still look great!
My daughter was very pleased with the outcome!
Frozen Birthday Cakes
What I loved about making this cake is that not only did it make an impression, but it was very easy to make!
Some birthdays I have it in me to spend several days on a cake, and some I just don’t!
This cake allowed me to please everyone while keeping my sanity!
How to Make the Frozen Birthday Cake:
Start by gathering your supplies.
You will need:
Enough cake to make two 4×2 inch round cakes, two 6×2 inch round cakes, and two 8×2 inch round cakes.
Enough Icing for all of your cakes. Make a white icing that is thick enough to pipe. If it’s too runny it will not hold the pictures to the cake or hold it’s shape while piping.
Icing Decorator Tips I used two different size round tips. The biggest and one of the medium sizes in this kit.
Let-it-Go Frozen Olaf Letter Candles
Candy Ice Castle Cake Topper (recipe from Chica and Jo) however I made mine a deeper blue color than theirs by adding a darker color blue icing color.
How to assemble the cake!
Make your candy ice castle cake topper the day before you are ready to make your cake.
Bake your cakes and color your icing to the desired shade of blue. (Reserve some white icing to pipe around the layers and pictures)
Once your cakes are cool, place a cake layer of each size on its own cake circle. You will need to cut each cake circle to fit each cake. The cake circle should not stick out from the cake. You should not be able to see it once your cake is sitting on it.
Then place the second layer of the same size on top of the layer that is on the cake circle with a thin layer of icing in between each layer.
Ice each layer using a cake spatula, making your icing as smooth as possible.
Insert into the two largest tiers these dowel rods cut to be the exact height of each tier. I stagger four rods in the middle of the cake a couple of inches apart from one another.
The rods and cake circles will prevent the weight of the top tiers from crushing the bottom tiers as well as prevent the cakes from tipping over.
Once each layer is iced, carefully stack the layers together, from biggest to smallest.
Then it’s time to add your decorations!
Following the directions on the package, apply the cupcake images to the sides of each layer. I staggered mine so that they were evenly spaced out.
Next, add your white icing to your decorator bags using your large round tip and pipe dots along the base of each tier.
Change your tip to a smaller round tip and pipe around each edible image.
Next apply your edible snowflakes to the sides of the cake in between each image.
And finally stick your ice castle candy pieces into the top of your cake.
Push them down into the cake enough so that they don’t topple over.
And that’s it!
A beautiful, yet easy, frozen birthday cake!
If you have extra batter and icing you can also make a few cupcakes to go along with the cake.
I added the extra ice castle candy pieces to the tops of my cupcakes as well!

I hope you and your birthday girl enjoy the frozen birthday cake as much as we did!
Let me know how it turns out by leaving me a comment below!
And be sure to send me a picture of your cake:)
Have a happy frozen birthday party!