Are you throwing a dinosaur birthday party? Are you looking for a great dinosaur birthday cake to serve to your guests? Your birthday boy, as well as your guests, will love this dinosaur birthday cake!
This site contains affiliate links. If you make a purchase using one of these links, I may earn a commission. Please visit my disclaimer page for more information about cookies collected and our privacy policy.
How To Make a Dinosaur Birthday Cake!
When my son came to me and said he wanted a dinosaur birthday cake I thought, ok, no problem.
I can think of a million cute dinosaur cake ideas!
And then he said that he didn’t want a cute dinosaur cake! He wanted a real looking dinosaur cake.
To be honest, I was a little insulted! lol I thought that all of my past dinosaur cakes looked great, but apparently they didn’t look real!
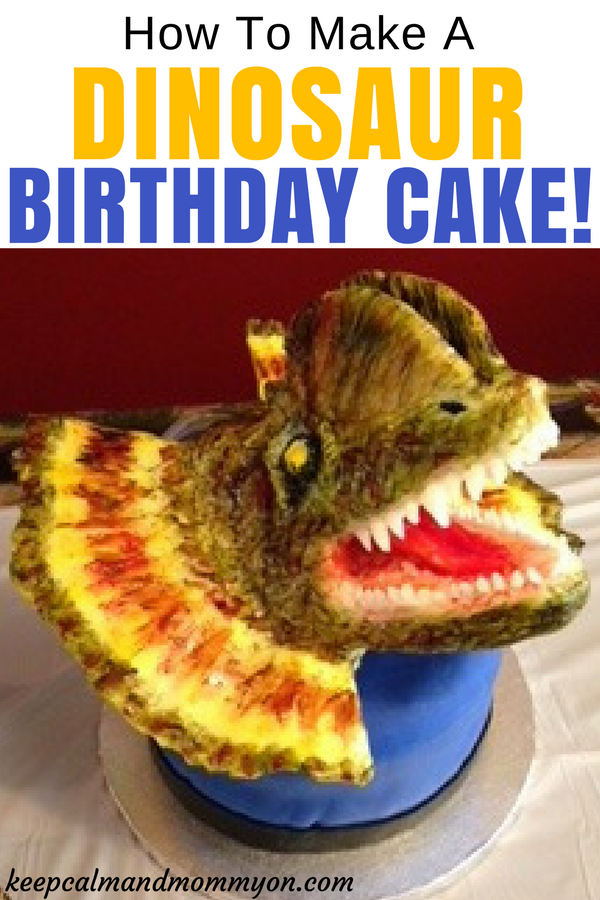
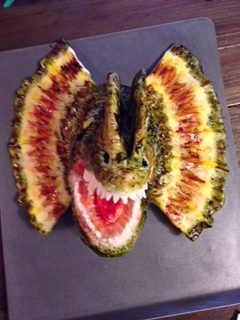
And then, to make something as simple as a birthday cake harder, he tells me that his dinosaur cake needs to be a Dilophosaurus cake!
A dilopho-what?!
So I googled Dilophosaurus and realized that he’s the dinosaur from Jurassic Park that has the big frill around it’s neck.
Now I’m feeling a little pressured!
I mean, most of my kids say, yeah I’d like a Frozen cake, or a Ninja Turtle cake, not a Dilophosaurus and it needs to look life-like cake!
But never-the-less, I always try to deliver the cake that they ask for. I want to make their birthday as special as possible!
So, I set to work!
I pulled out all of the model Dilophosaurus dinosaurs that my boys had and googled as many pictures as I could find.
And this is what I came up with!
Dinosaur Birthday Cakes
Now, it’s hard for me to give you exact directions to make this dinosaur, because I didn’t write them down!
I know, I’m very sorry!
But I can give you tips and tell you what I used to make it.
How to make the Dinosaur Birthday Cake
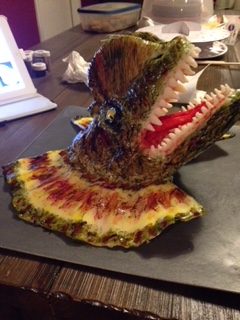
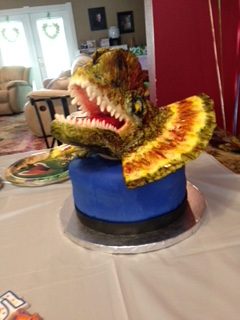
The main part of the dinosaur’s head and jaws is made out of Rice Krispie Treats.
You can either make your own or buy them. I had plans to make my own, but time didn’t permit so I bought mine.
Shape your rice krispies into the shape of its head. I also recommend inserting dowel rods into the rice krispies to help hold them together. And try to keep it as cool as possible, if it gets too warm the rice krispies will become gooey and start to fall apart!
Once the head was shaped I covered it in white fondant. Once the fondant is on, mold it into the shape you want. I used fondant modeling tools to add lines and creases into the tall pieces on top of his nose, to give him nostrils and to make his skin look rough and bumpy.
The rice krispies under the fondant help to give it a bumpy, scale like look as well!
I rolled little balls of fondant and added them for his eyes and I rolled little ropes and positioned them around his eyes for eyelids. Use your fondant tools to mold the area around the eyes to make them look indented.
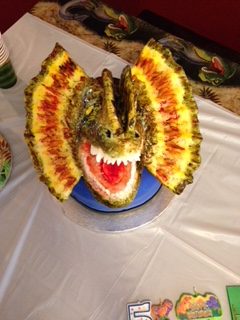
Next I made the frill around his neck.
I inserted dowel rods about an inch and a half apart all down along the side of his head at the bottom. Do this on each side.
Then I rolled out white fondant in sheets and laid it over the dowel rods. Mold it onto the dowel rods. Also mold it where it meets the head so that it blends in seamlessly.
Next comes the fun part!
Painting your Dilophosaurus!
I used straight Wilton Icing Colors to paint with. Literally just dip your paint brush into the color container and paint it onto the dinosaur.
I used different shades of dark green, brown, red and yellow to paint with. Blend the colors together in some areas to create different shades and a life-like look.
Now, if you find that from handling and assembling your dinosaur he starts to get a little droopy or starts to come apart, pop him into the freezer for a while!
I took mine in and out of the freezer while working on him and left him in the freezer overnight and until party time.
Also, if you need to prop something under his bottom jaw until he has been in the freezer for a while then do that.
After you have painted his body. You need to work on the mouth.
If you haven’t already, make sure his mouth is lined with fondant. You don’t want to see any rice krispies.
Then shape a tongue for your dinosaur out of fondant.
I stuck tooth picks into the back of my dinosaurs tongue and stuck those into the back of his mouth to hold the tongue in place.
Now you need to paint your dinos mouth. I painted the mouth a more pinkish color and the tongue more red.
After the tongue is in place and painted, start making teeth!
The bigger teeth you can attach using a tooth pic as well. But the smaller teeth can be attached by painting a small amount of water onto the gum and then holding the tooth in place on the wet spot for a moment. It should stick. Especially once he’s had a bout in the freezer!
Make the teeth different sizes, and of course very sharp!
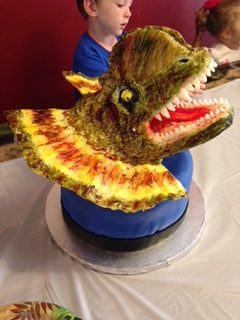
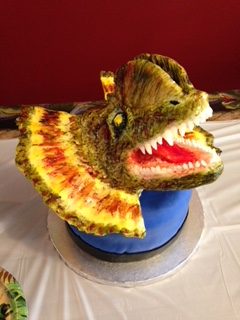
Once your dinosaur is finished, put him into the freezer! Trust me, This will greatly extend the life of your dinosaur!
Dinosaur Cake
Now, this dinosaur is not made of cake! So you need to make a cake to sit him on.
I made a two layered cake. I recommend using a 10×2 inch cake pan or bigger.
Once my cake was cool and iced, I covered it in blue fondant. Then I cut a strip of black fondant to go around the bottom.
I probably could have been a little more creative on the cake itself, but to be honest, I was kind of done after the whole dinosaur making experience! lol
And I really did want the dinosaur to be the star of the cake.
After the cake is covered in fondant, you want to stick four dowel rod pieces that are cut to the height of your cake into the middle of the cake.
Space the rods out a couple of inches or so.
The purpose of the rods is to keep the dinosaur from crushing your cake! I also cut a small piece of cake circle to sit on top of the rods between the cake and the dinosaur.
I used this round silver cake base to sit my cake on.
And that’s it!
I waited until my guests were arriving to bring the dinosaur out of the freezer and position him on the cake. That way he didn’t start to get droopy until after the party!
And while the dinosaur is technically edible, we didn’t eat him. He’s covered in so much fondant and dye that he really isn’t very healthy! But the kids did give him a little nibble;)
I hope you and your birthday boy enjoy the dinosaur birthday cake as much as we did!
Let me know how it turns out by leaving me a comment below!
And be sure to send me a picture of your cake:)
Have a dino-mite birthday party!
For more birthday party ideas check out: